


20
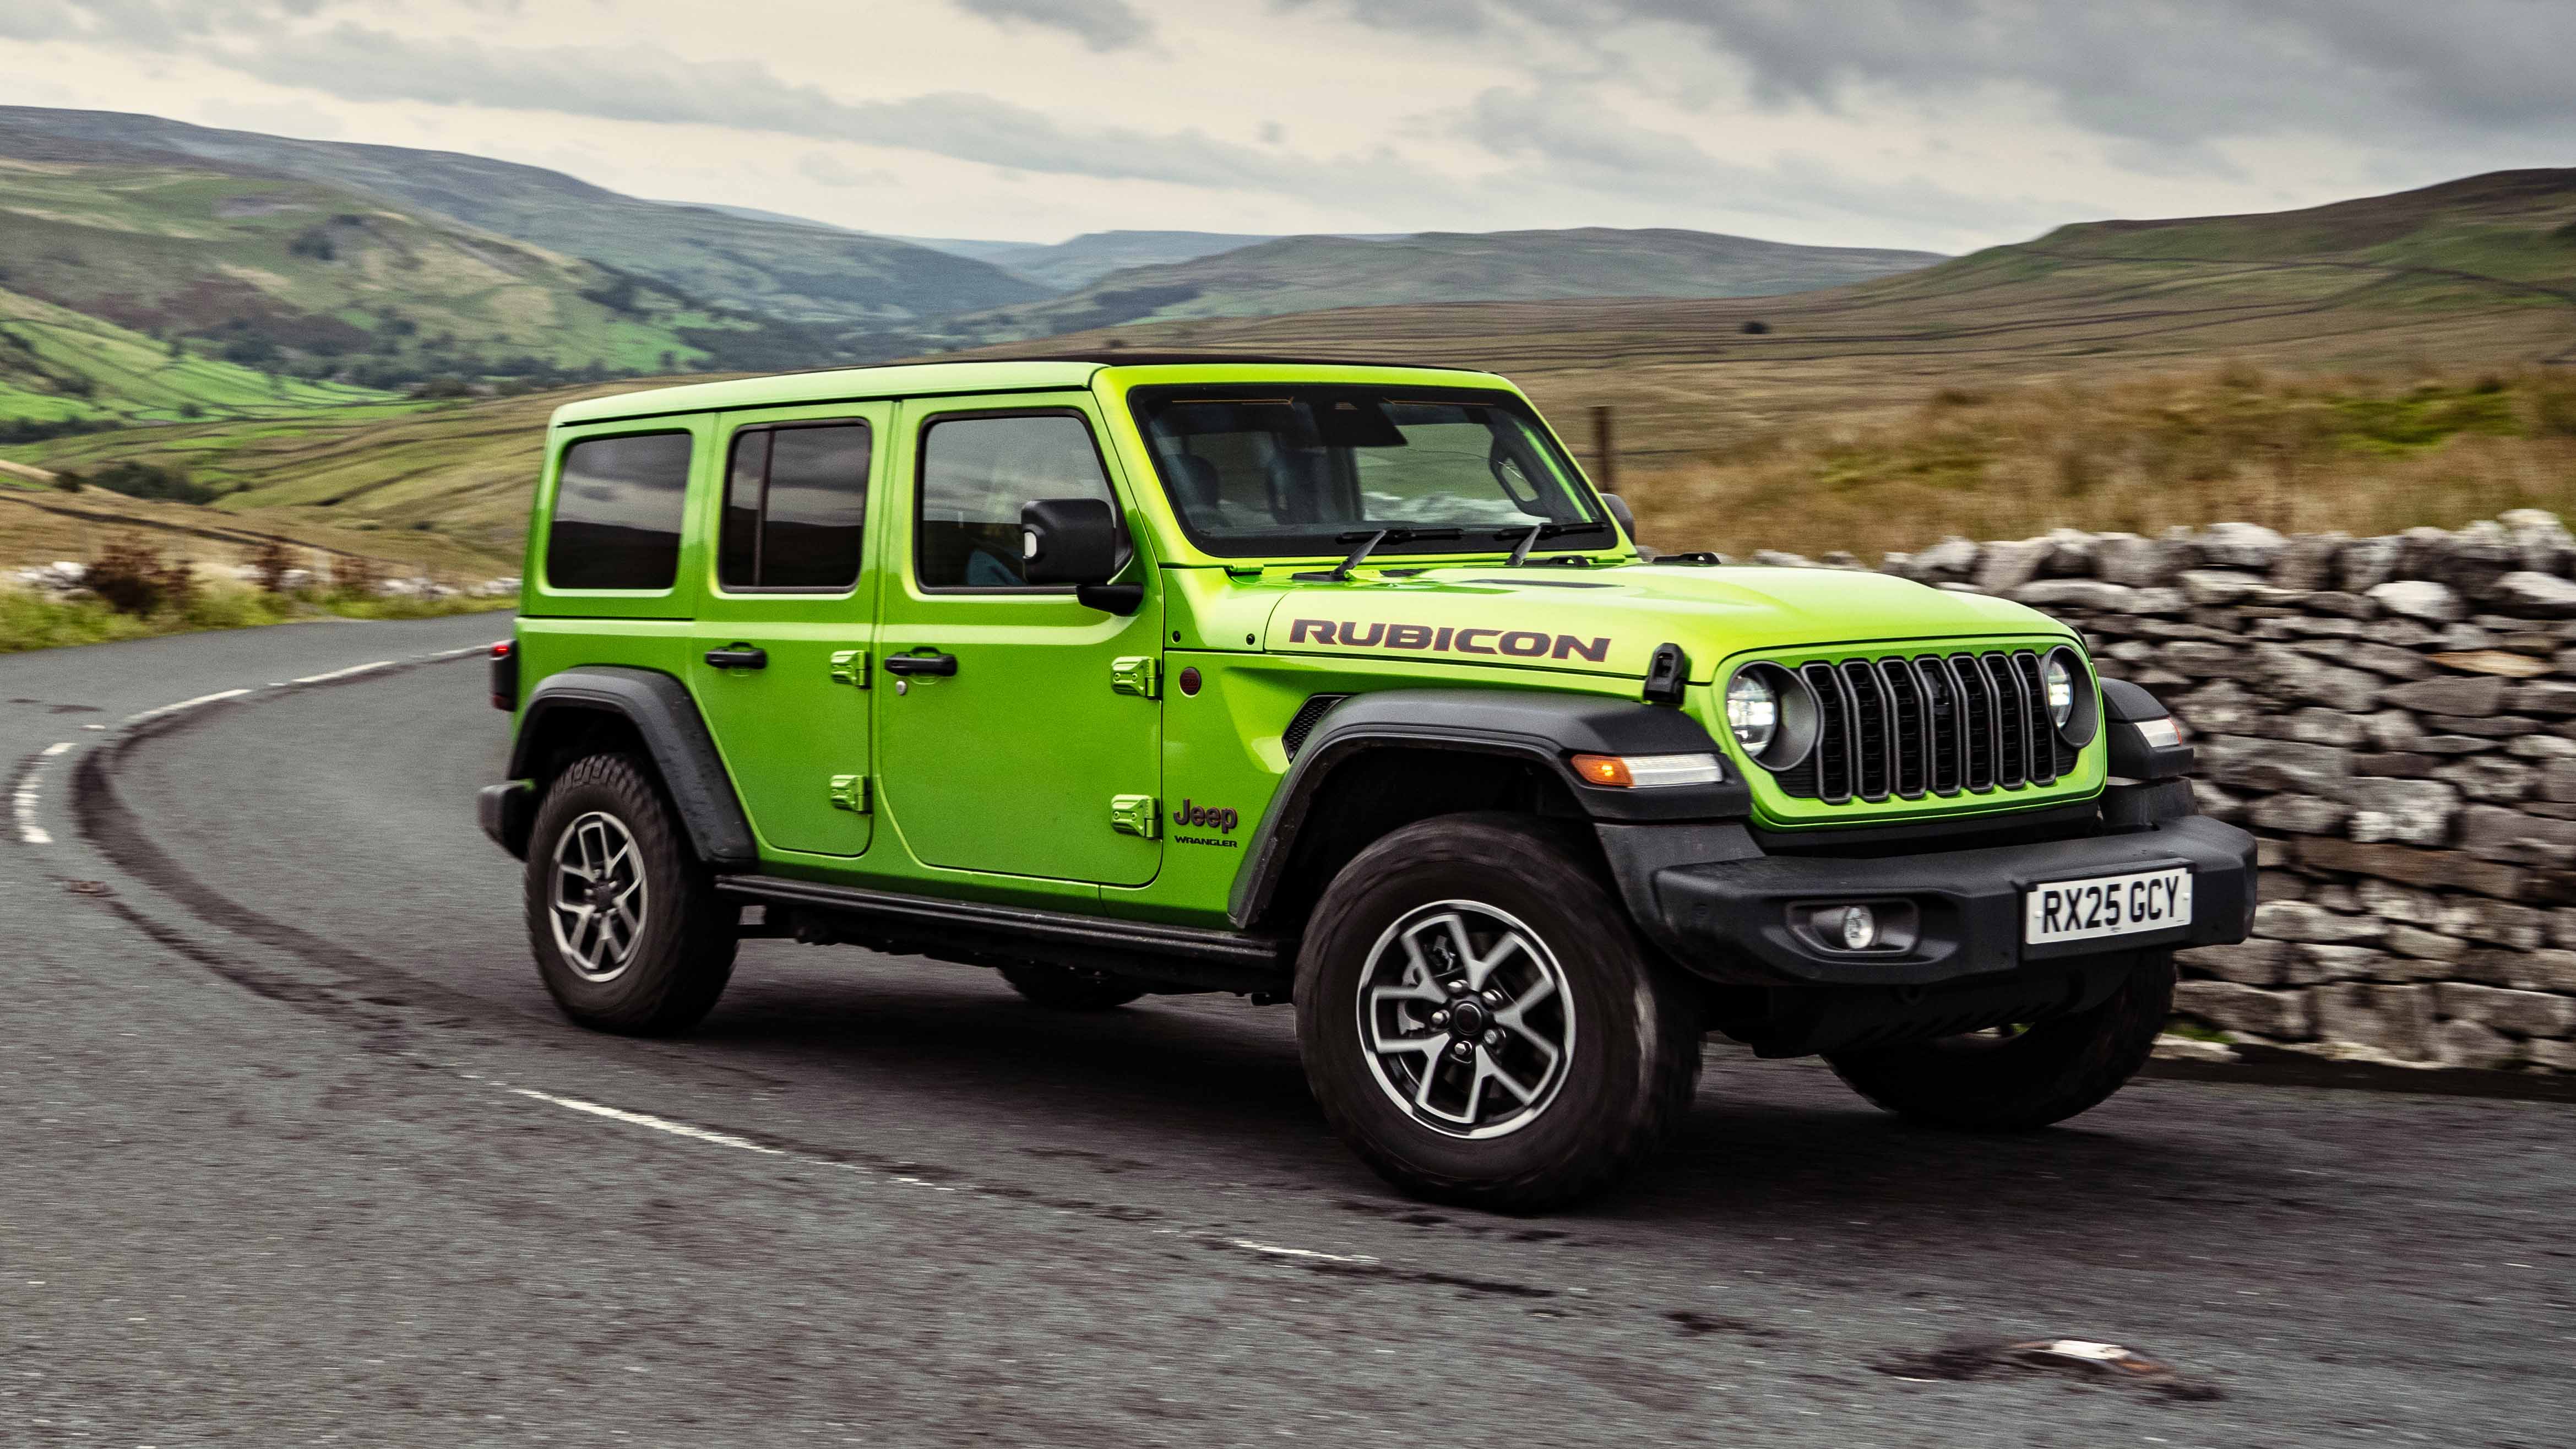
Jeep Wrangler Rubicon
1995cc
268.2bhp
A quid pro quo of running the Jeep Wrangler was that we could modify it. Which isn’t just music to our ears, but also makes complete sense. Why? Because it’s a Wrangler. The last of the Mohicans. A car that still believes the Earth is flat and that traction should be earned, not programmed.
If you scroll quickly through the #Wrangler hashtag on Instagram, you’ll see that – in the US especially – you’re pretty much in the minority if you don’t have a modified one. Either a hard-as-nails lifted ‘Street Jeep’, or something that could winch itself out of the Mariana Trench. Because there appears to be one rule: you don’t modify a Wrangler to make it better – you modify it to make it more. More clearance, more grip, more lights, more gear. The same attitude, just dialled up for more capability.
Well, that’s what we’re going for. More, more. And possibly even worse MPG. Oops.
We had to trek deep into Land Rover country: Yorkshire. Crossing the Dales (because we could) and picking up a monstrous, frustrating and ever-growing windscreen crack on the way, we soaked up the stock Rubicon’s look – already more aggressive than the road-biased Sahara.
As ever, the Jeep looked fabulous parked outside ivy-covered pubs. It just makes you want to clatter across a landscape, up Malham Cove, through drystone walls, through streams, past sense and reason. Instead, we headed east (via the Tan Hill Inn – the highest pub in Britain) to an industrial unit not far from Beverley, where the exciting work would get underway.
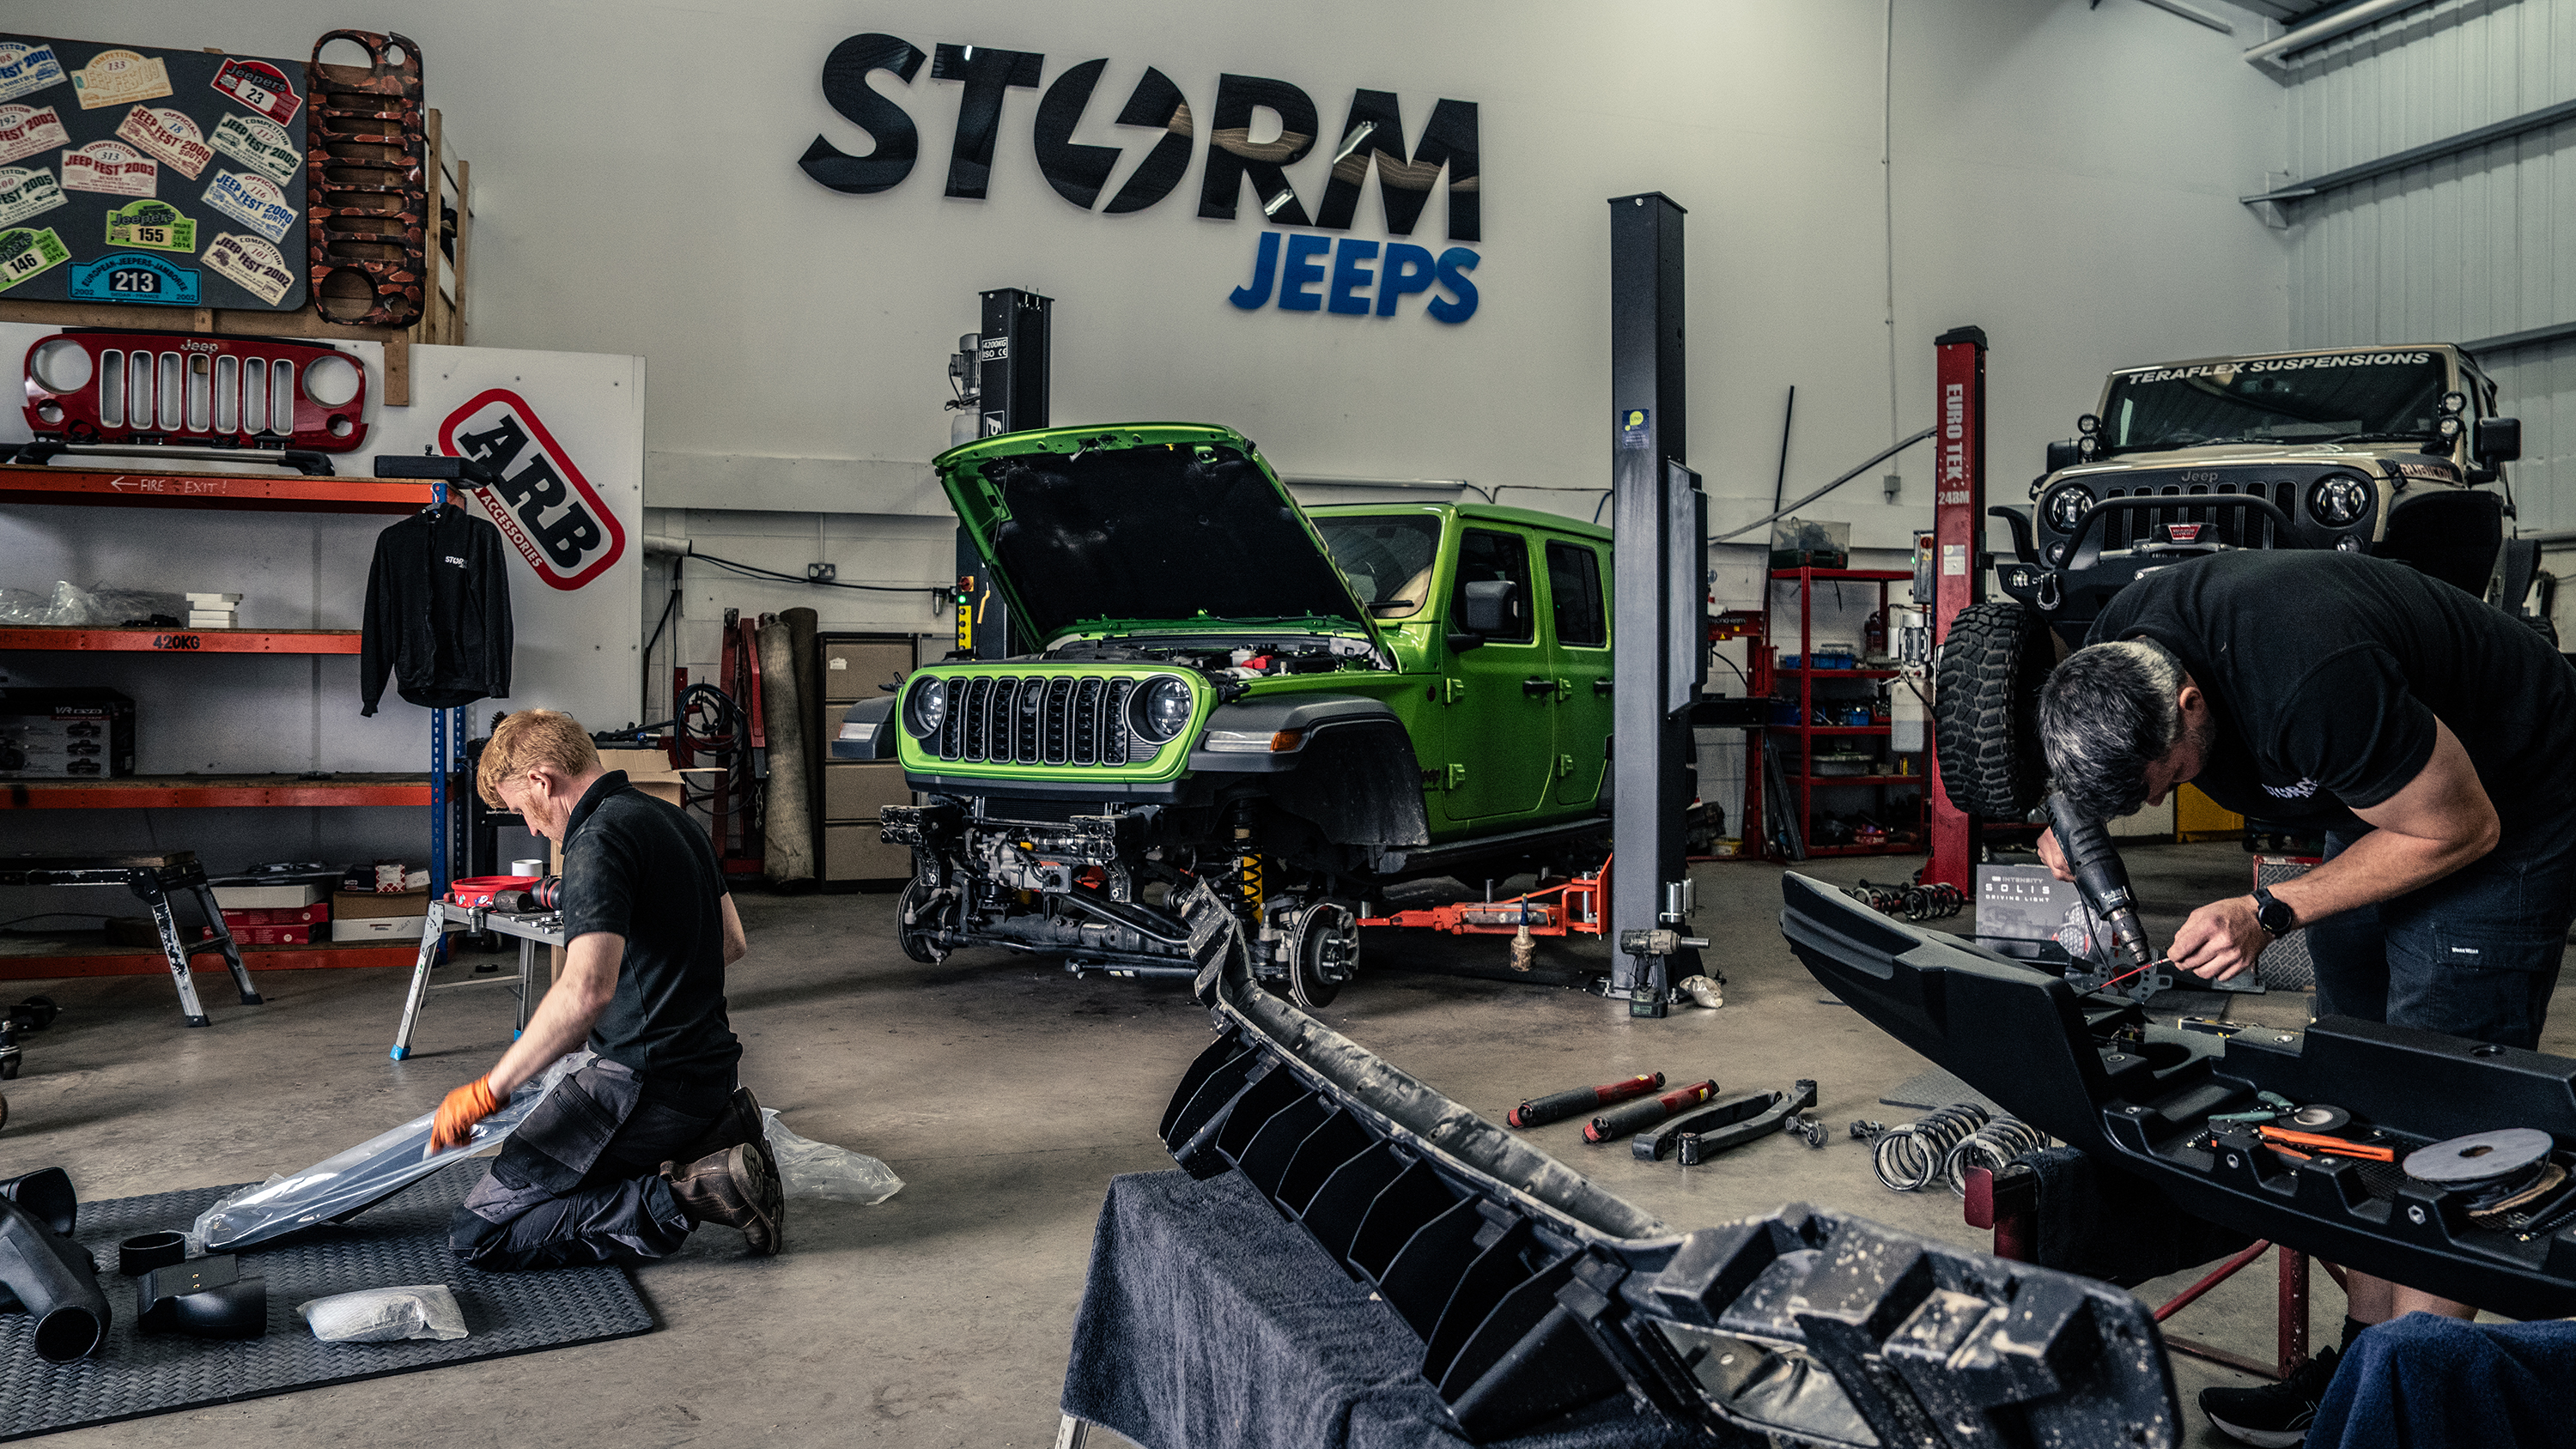
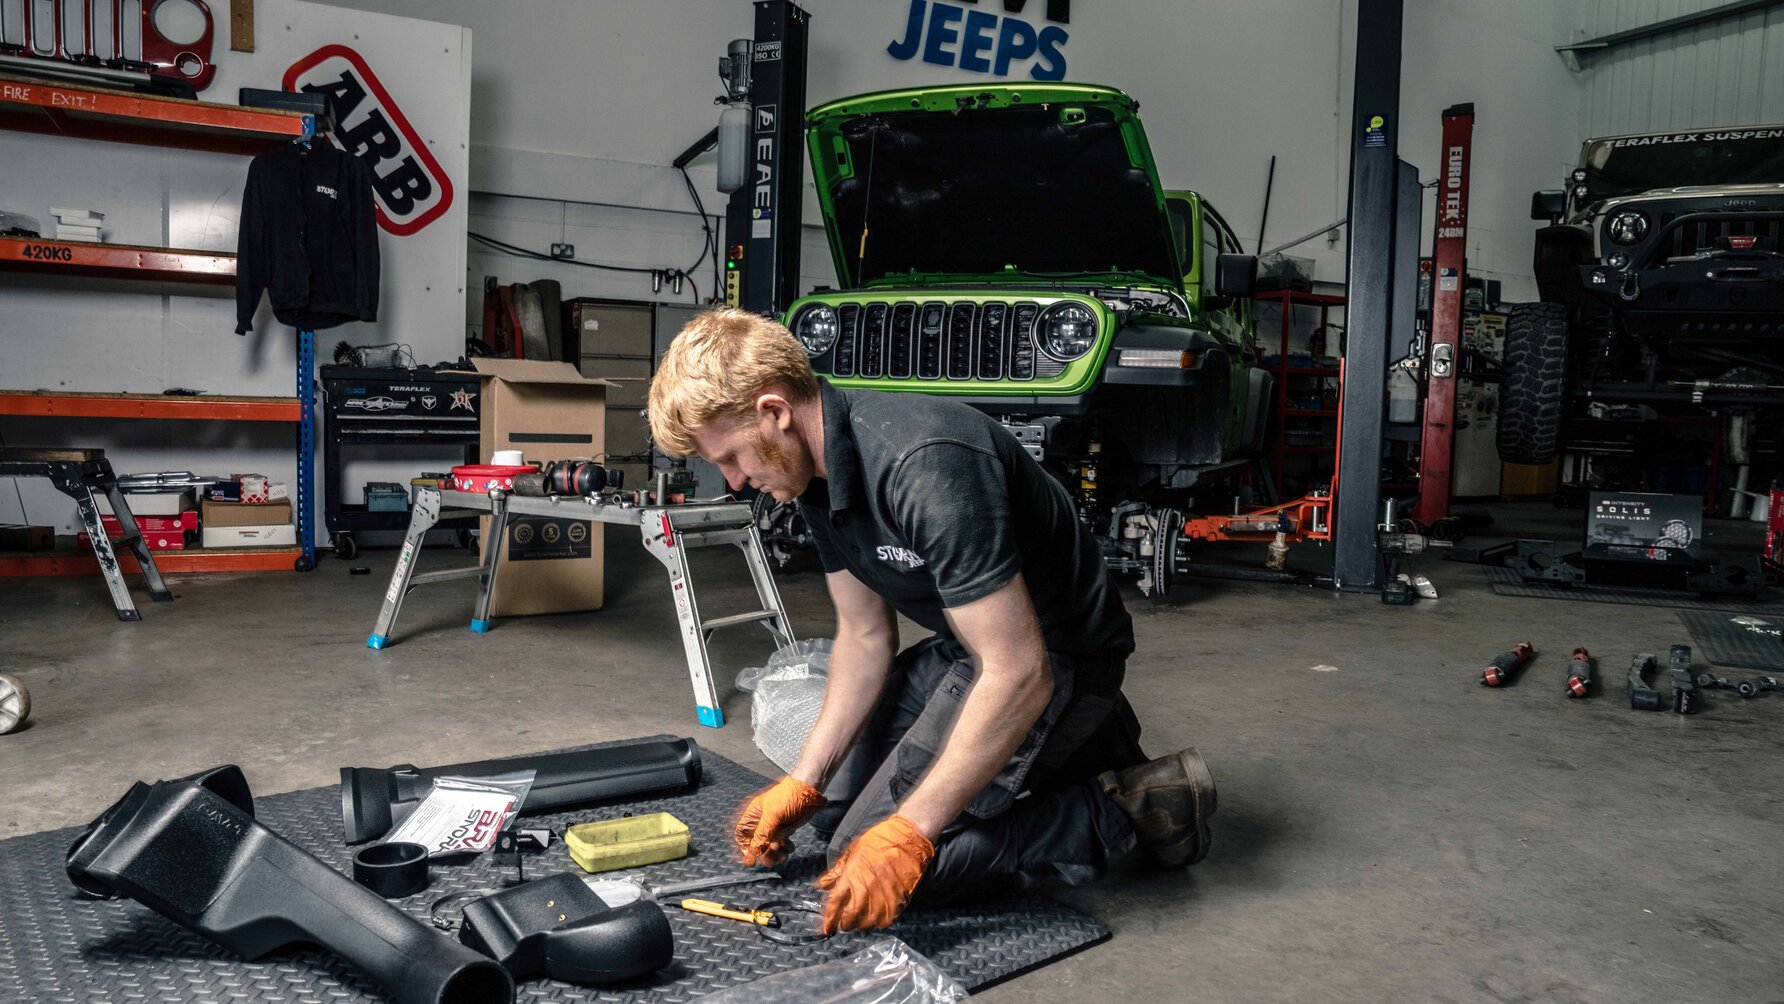
Because here, in a place once better known for tractors and terriers, lives Storm Jeeps – the folks tasked with transforming Top Gear’s long-term Jeep Wrangler Rubicon into something far more serious.
This corrugated shed isn’t so much a modded Jeep dealership, nor a tuner – more of a Wrangler whisperer’s lair. The man behind it all is Andy. A former aerospace apprentice who fell in love with Jeeps before they were cool (or cool again, depending on your allegiance). Andy and his dad started a club – Jeepey – that spiralled into a parts business and, eventually, in 2016, into Storm: the UK’s go-to for proper off-road Jeep builds.
And over a day and a bit, Andy and his mechanic Sam began our Jeep’s glow-up with some tasty parts. Here’s the step-by-step guide.
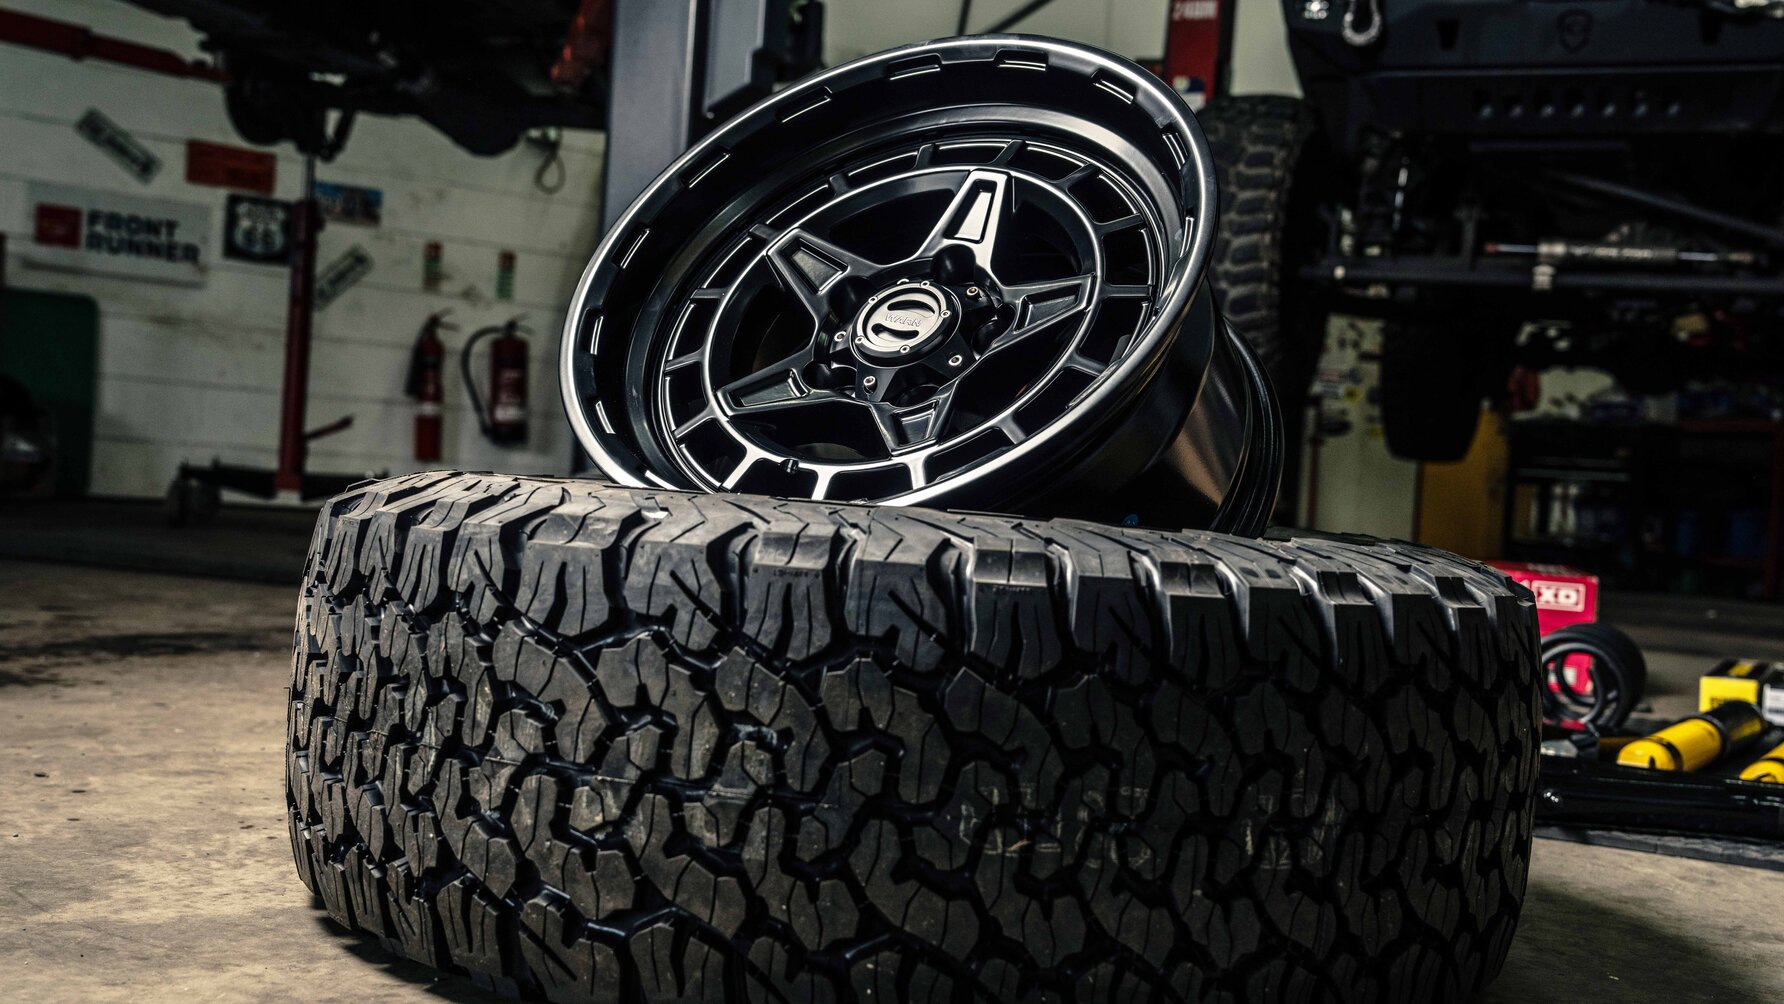
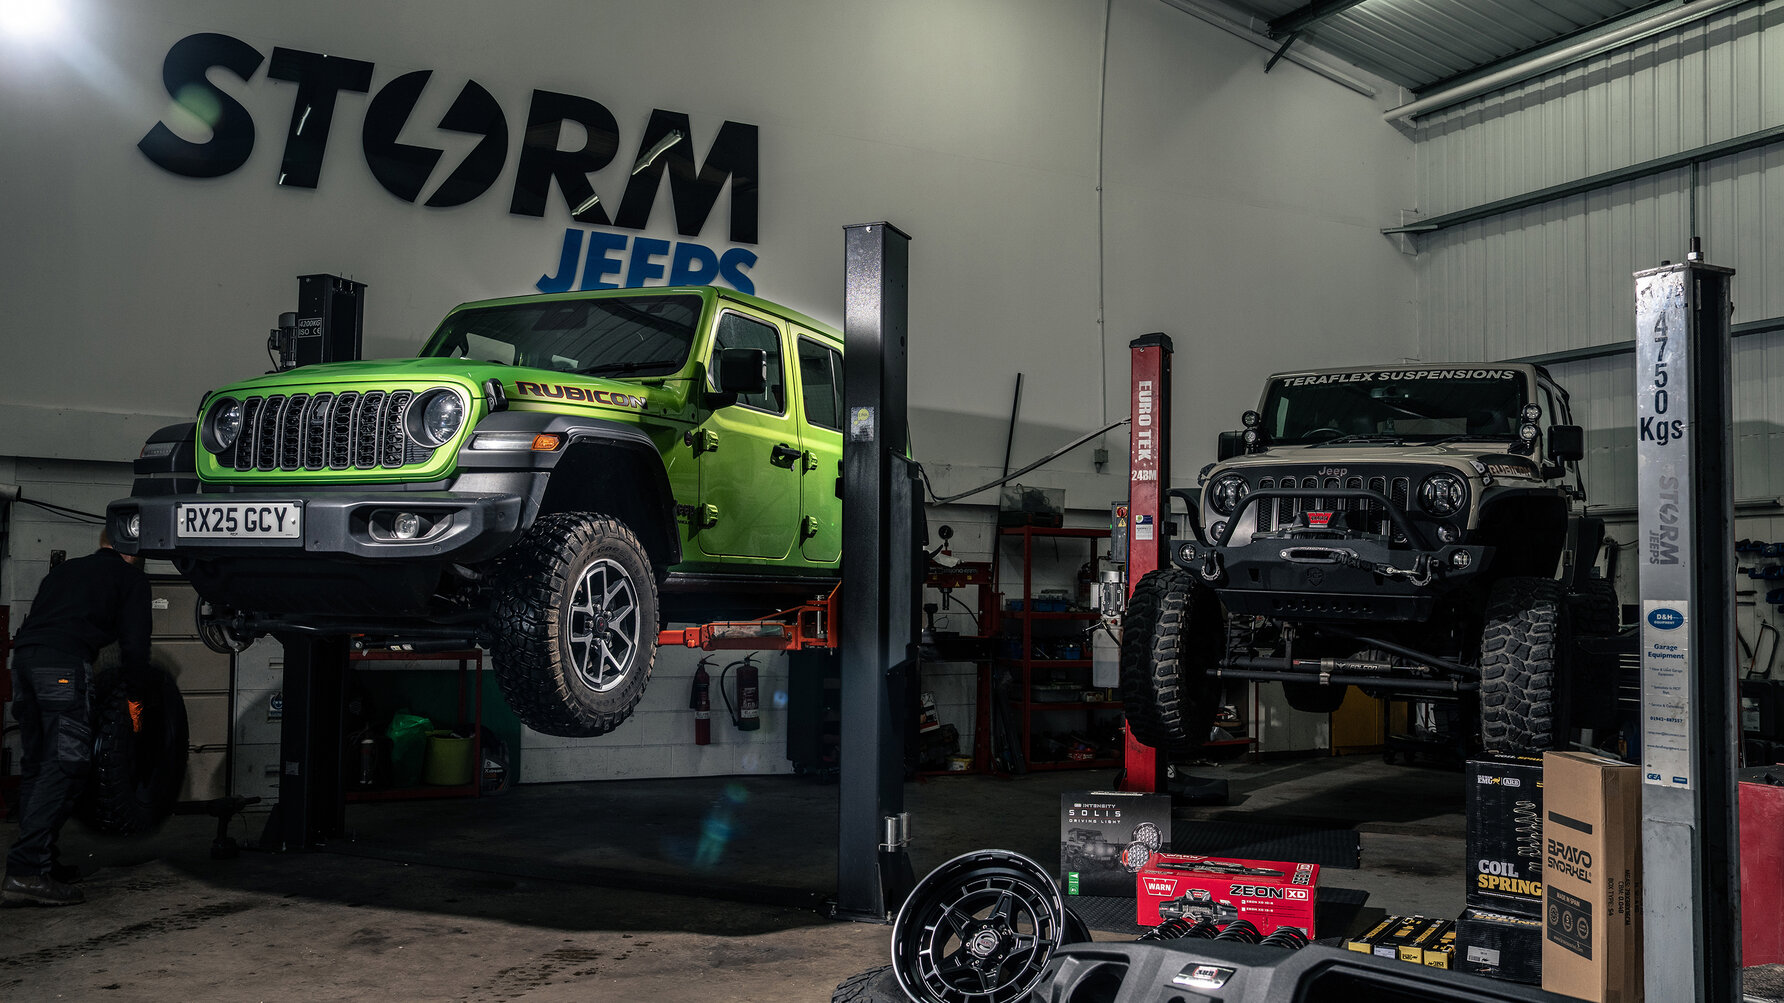
The Wrangler rolled in on its factory wheels and tyres, which, according to the guys at Storm, were impressively worn.
“Half the block is gone,” Andy muttered. “What have you been doing, a track day?” Sam added sarcastically.
Well, kinda. If you missed the last report, I urge you to click back because I am probably the only UK Wrangler owner who has been on track and done a rolling burnout.
The stock tyres were 255/75R17 BFGoodrich KM2s – narrow, knobbly off-road mud tyres. Decent. But as the seasons changed and roads turned colder, greasier and wetter, braking distances have become sphincter-clenching as there’s around 20 per cent less rubber in contact with the road than on a normal tyre – because of the knobbliness. I’m pretty sure that’s a word.
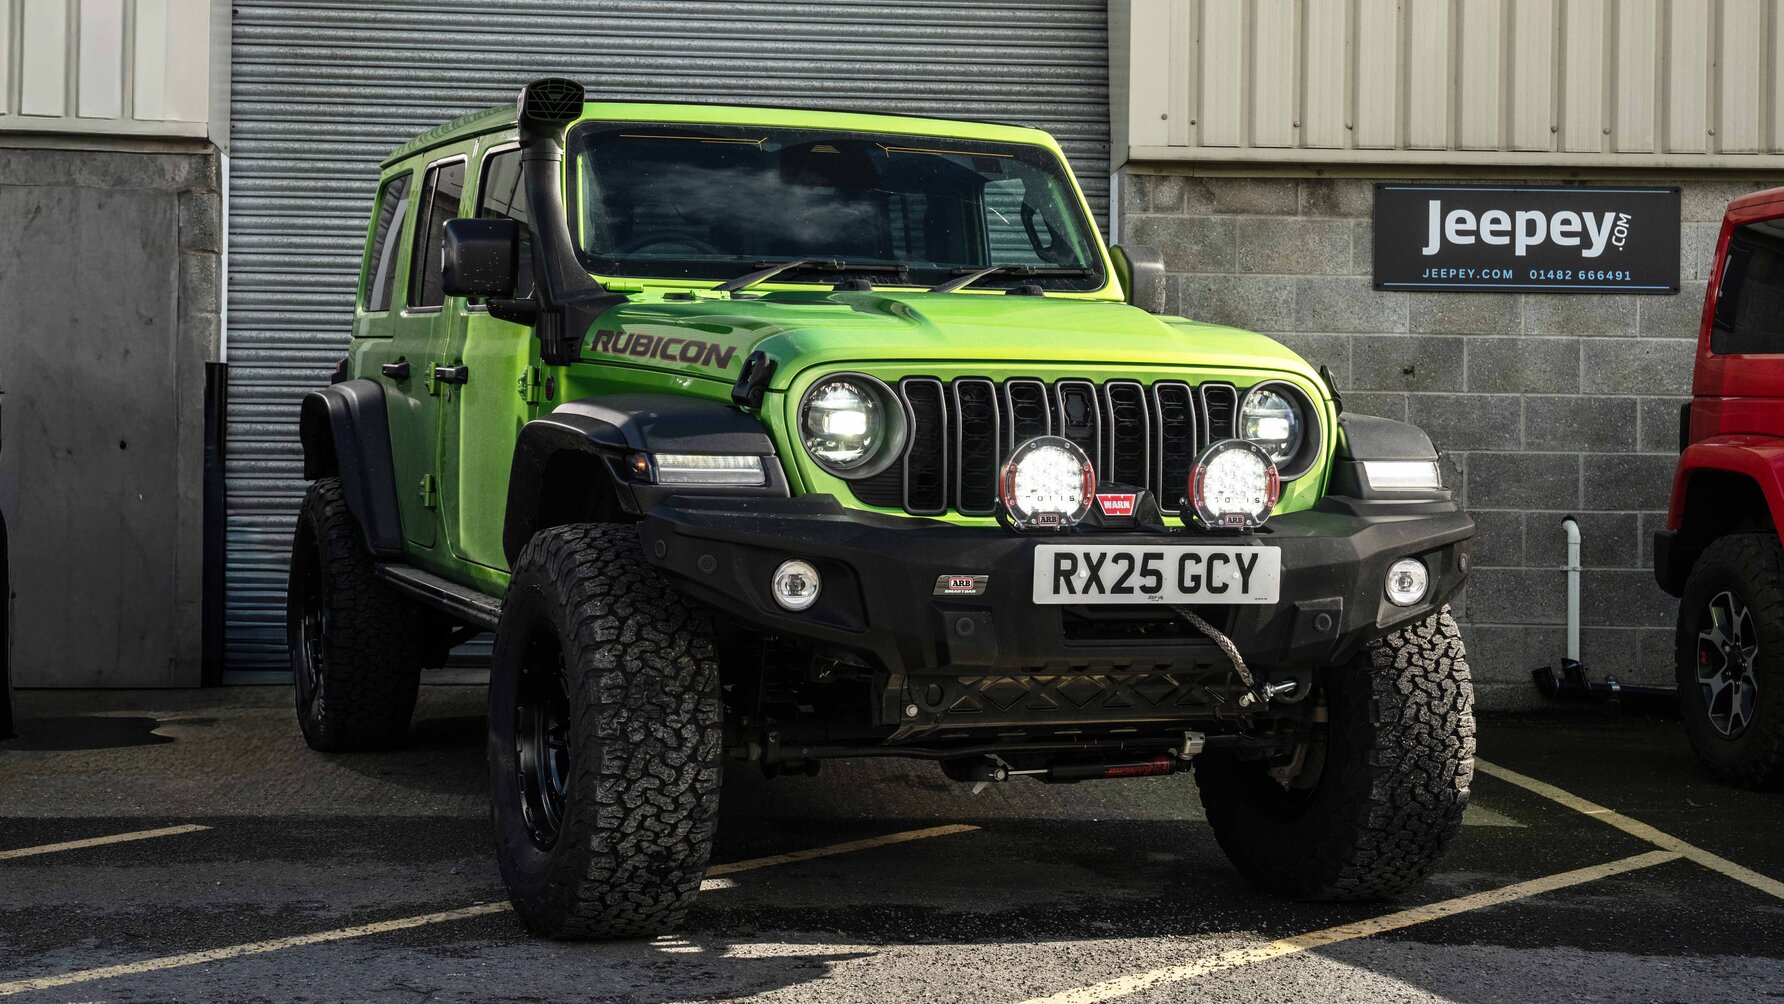
So, in come the 315/70R17 BFGoodrich KO2s – the all-terrain benchmark. Two inches taller, two inches wider, with reinforced sidewalls and a flatter, more road-friendly tread. Hopefully grippier, and quieter too.
They’re mounted to Warn’s Diamond Cutter wheels – 17x8.5 inches, ET0 offset, with a pseudo-Merc penta five-spoke design that draws the eye to the centre like an illusion as it’s only 14 inches across, so the tyres look even bigger. While the wheels, tyres and TPMS sensors are taken away to be fitted and balanced, Sam cracks on.

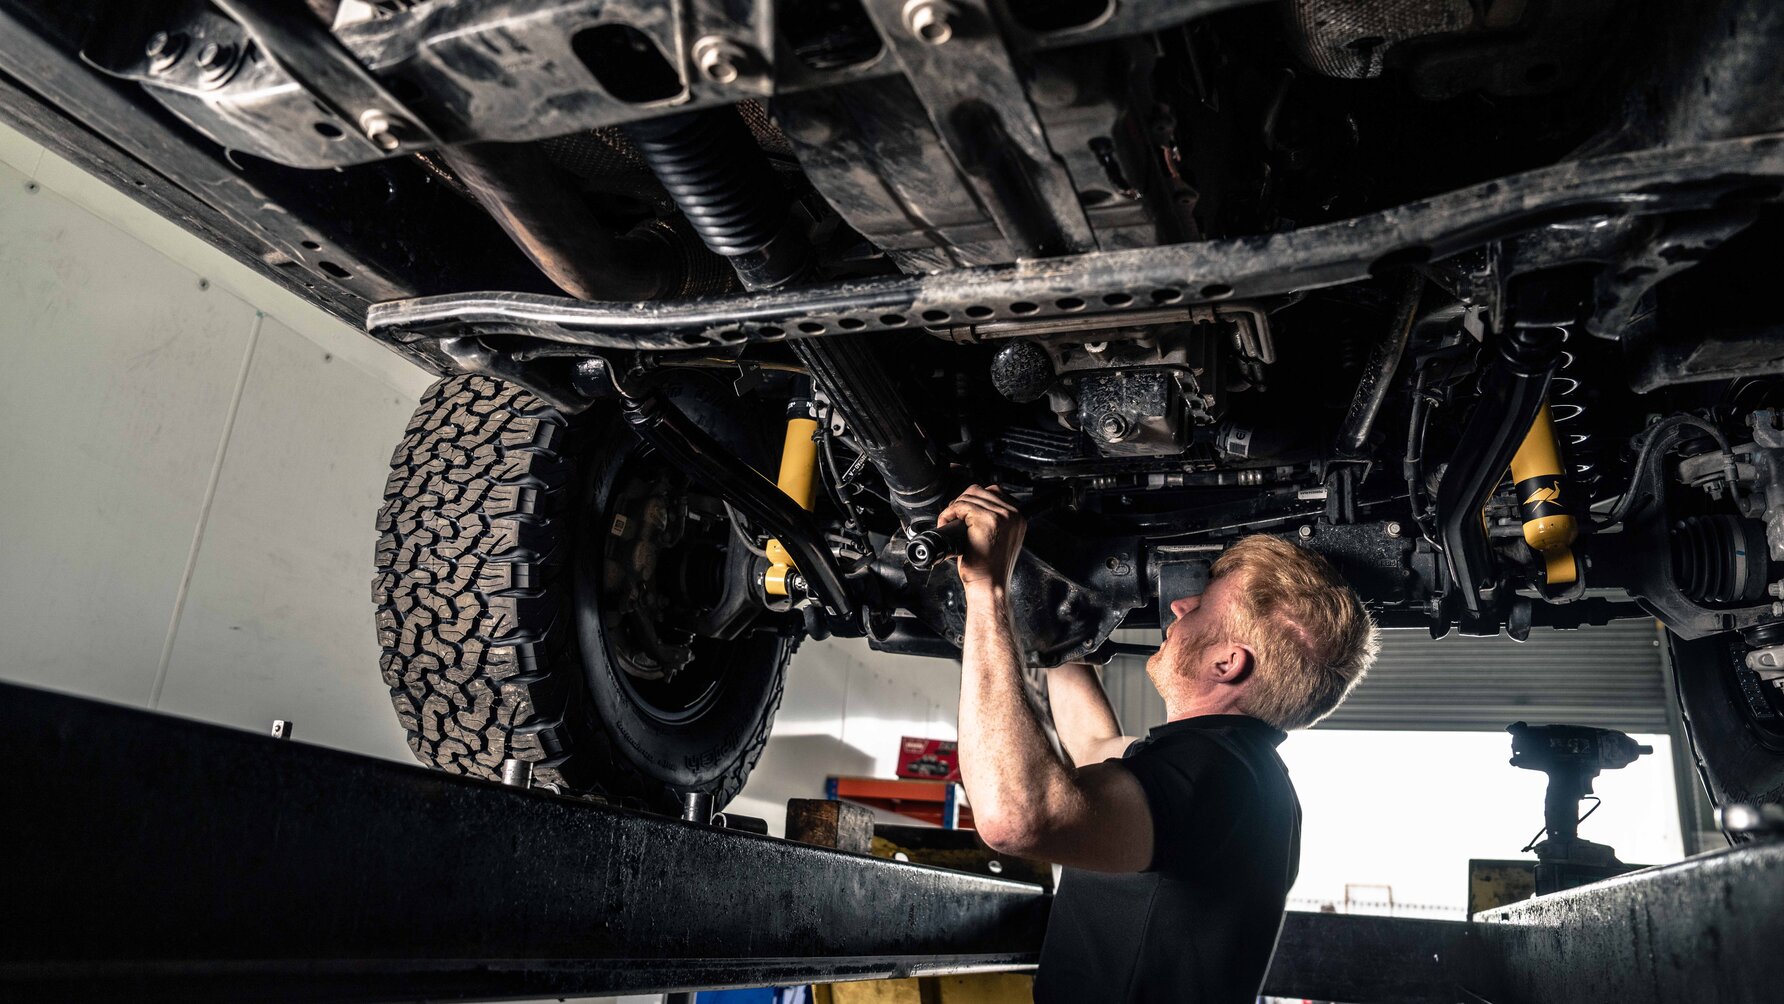
Here comes the only mod that needs proper tools – everything else is bolt-on, bolt-off. To accommodate the 2.5-inch lift kit we’re fitting, we need to address the axle’s geometry. So, Sam drills two new holes into the axle and fits a track bar relocation bracket – the only irreversible mod in the entire build.
Without it, the lift would shift the axle off-centre, affecting handling and tyre wear. The bracket raises the mounting point, restoring correct geometry. Once fitted, the axle sits square and predictable, ready for more suspension meat.
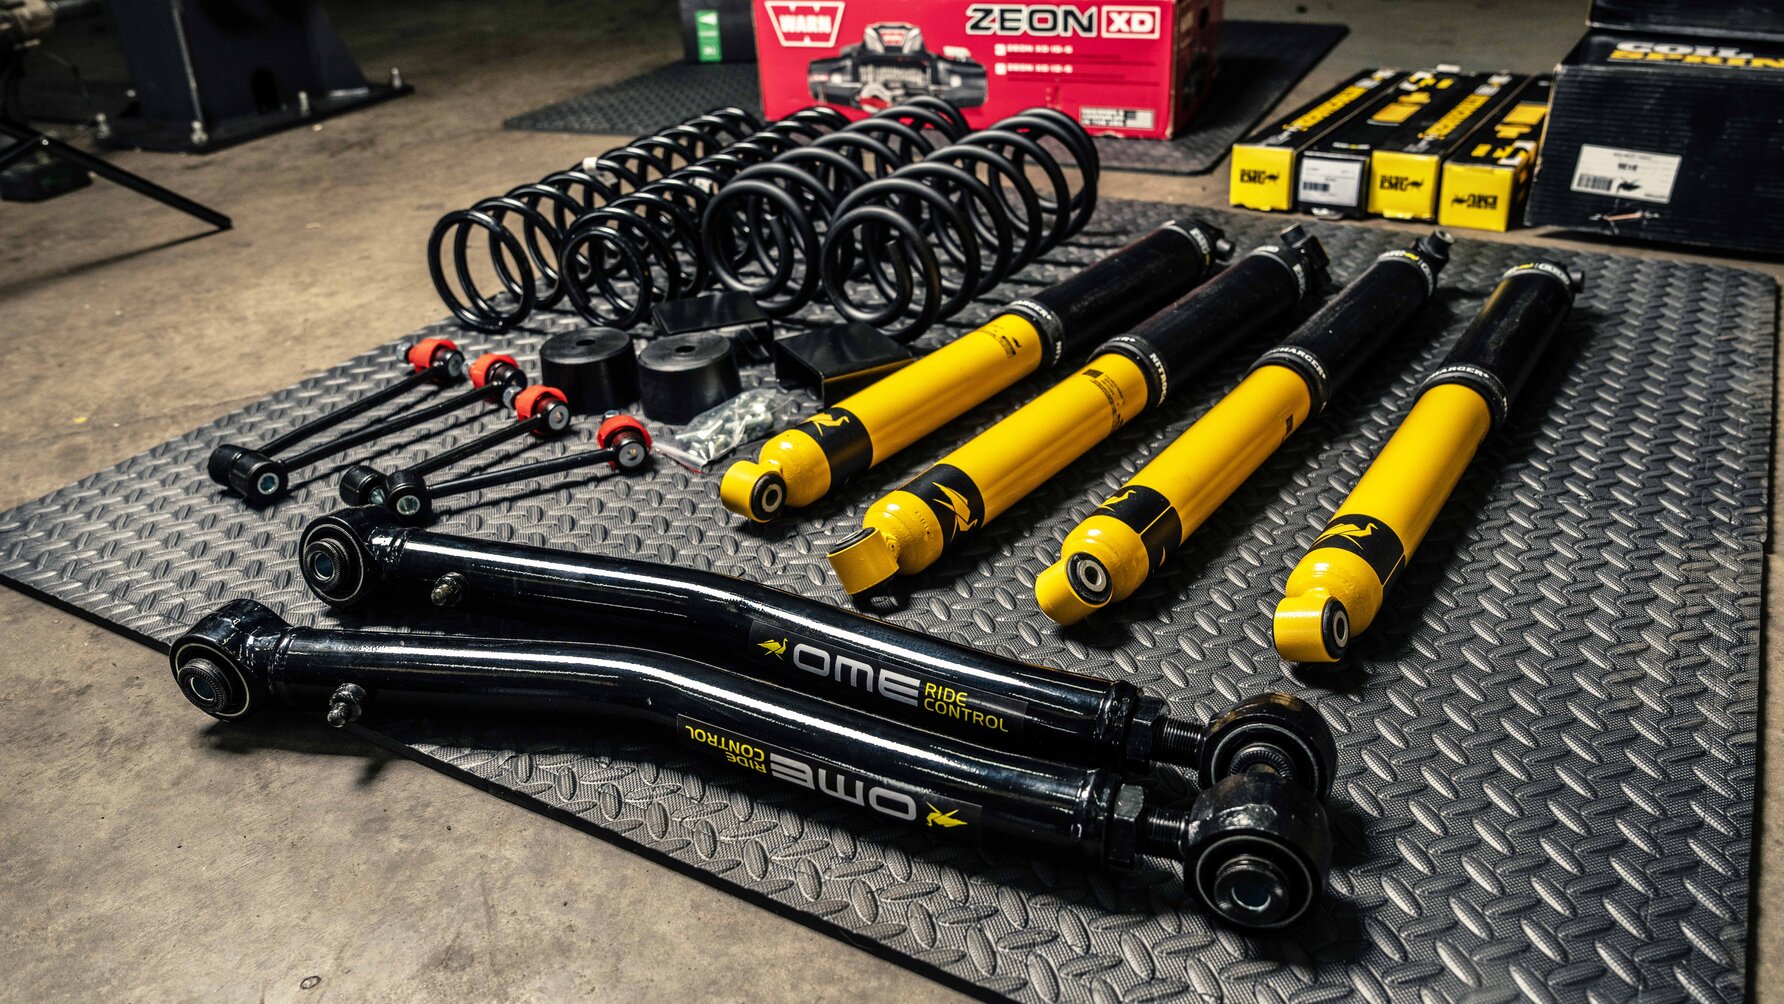
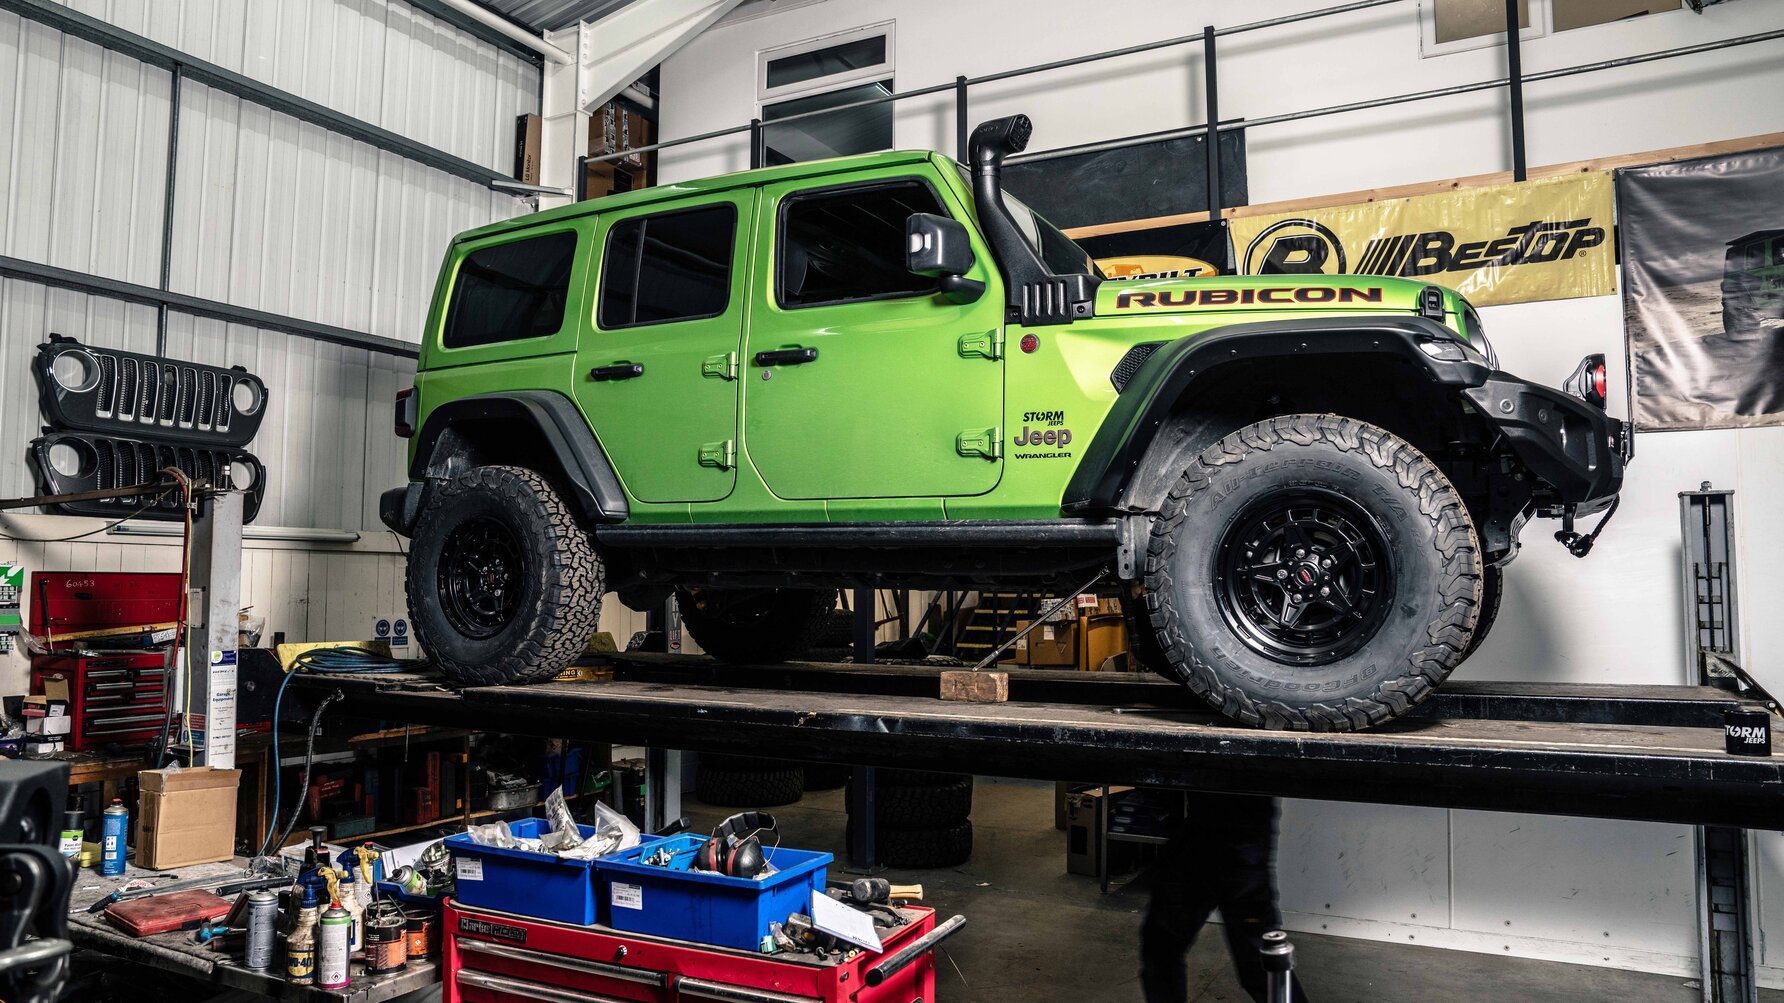
The standard suspension – passable, but nothing special – is unceremoniously binned in favour of a full ARB Old Man Emu 2.5in lift kit. Developed in Australia for outback conditions, it ditches gimmicks in favour of real-world use.
“No coilovers or remote reservoirs here,” says Sam. “This is designed to work – loaded up with kit, hammering down corrugated tracks or climbing out of wet Welsh valleys.”
The kit includes longer springs, uprated shocks, extended sway bar links, adjustable lower control arms, plus bump stop extensions. The driver’s side spring is longer to compensate for the off-centre fuel tank. A detail that tells you everything you need to know about the engineering.
Compared to stock, the Jeep should now feel tighter but calmer, more in control through corners, and less nosey under braking.
Sam adds extended sway bar links and adjustable control arms to allow for proper caster tuning – essential for both geometry and steering feel. Oh, and bigger bump stop extensions are also fitted – small, reassuring blocks that prevent the tyres from punching through the wheel arches under compression.
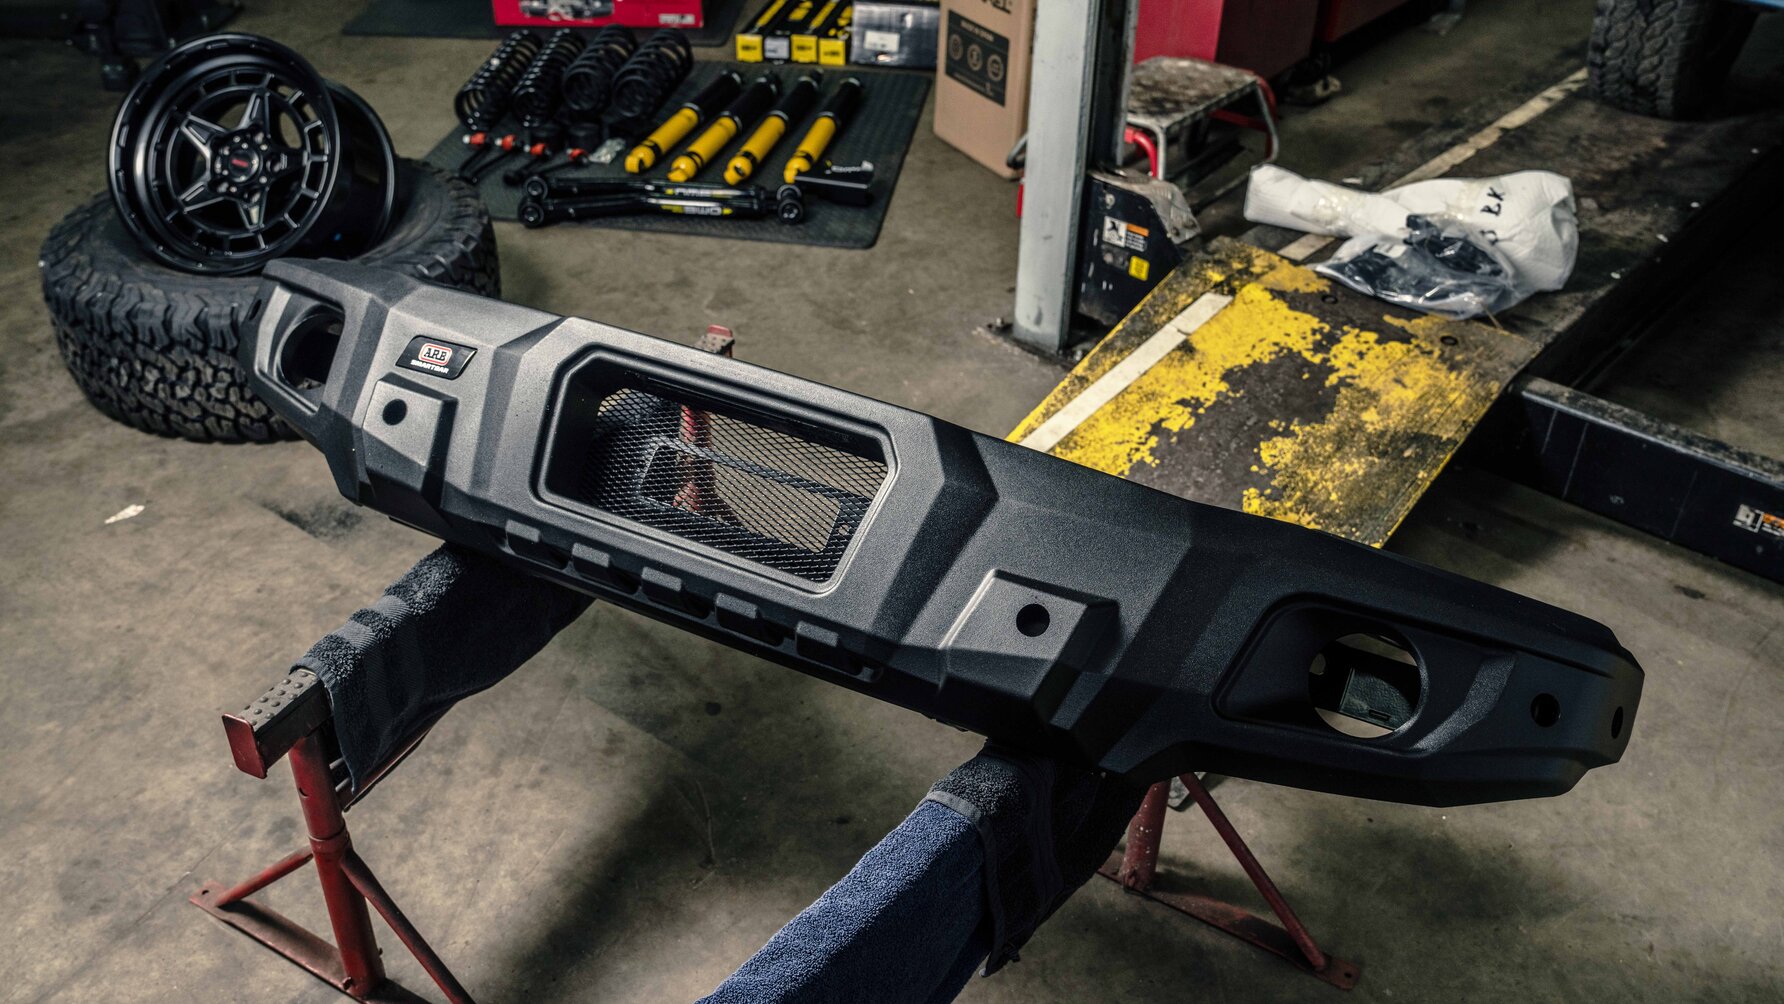
Time for some facial surgery – and to sort out that awful plastic underbite of the standard bumper. Off comes the factory ‘diving board’ and in its place goes the ARB Stealth Recovery Bumper – a lighter, cleaner, and better-designed piece with a 38-degree approach angle. It’s not Mad Max – it’s militarily tidy. Andy transfers the fog lights, parking sensors, and wiring across. Fiddly but doable. Main thing? There’s now space for our new toy...
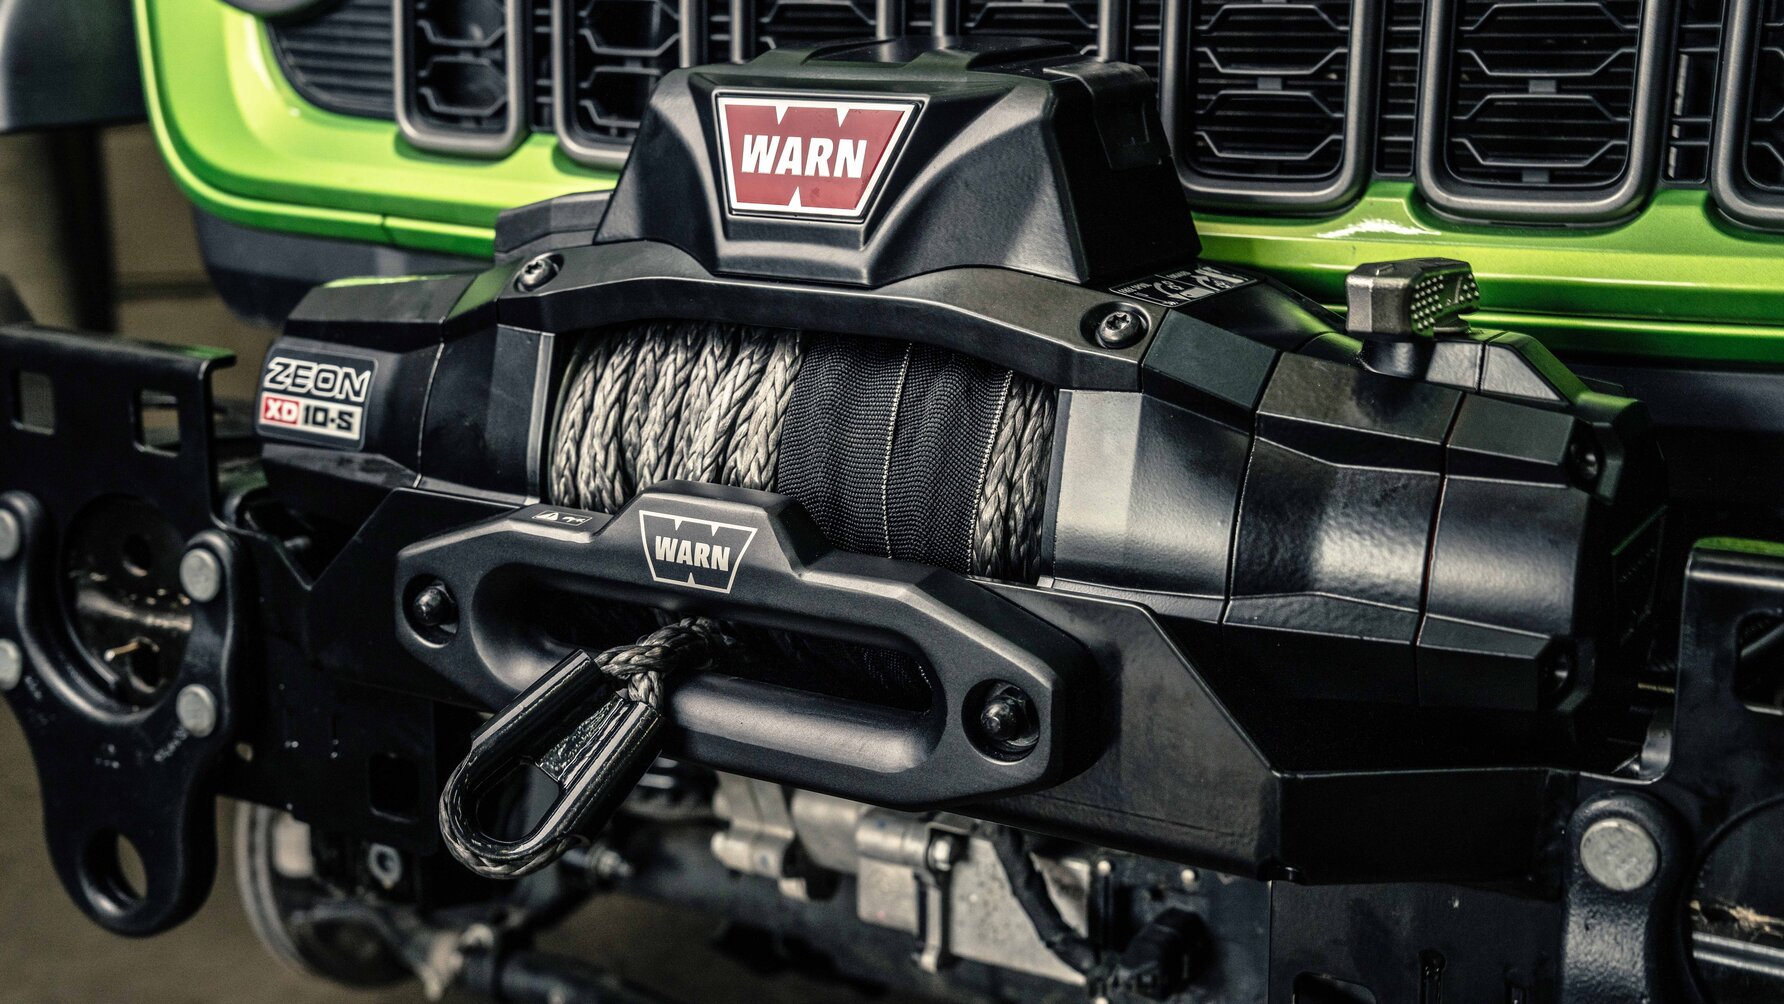
Into the bumper slides the build’s visual hero: the Warn Zeon XD winch. This isn’t just any winch. It’s IP68 waterproof (meaning fully submersible), uses synthetic rope (safer and easier than steel cable), and has LED lights on the motor body that change colour depending on temperature: green for go, yellow for caution, red for “Hold on mate, I need a sit down”.
It even has a companion app, so you can winch from your phone. Or, if you’re old-school, there’s a waterproof bung and plug-in remote. It’s rated to 10,000lbs – five tonnes. Enough to yank out two Jeep from the depths of hell.
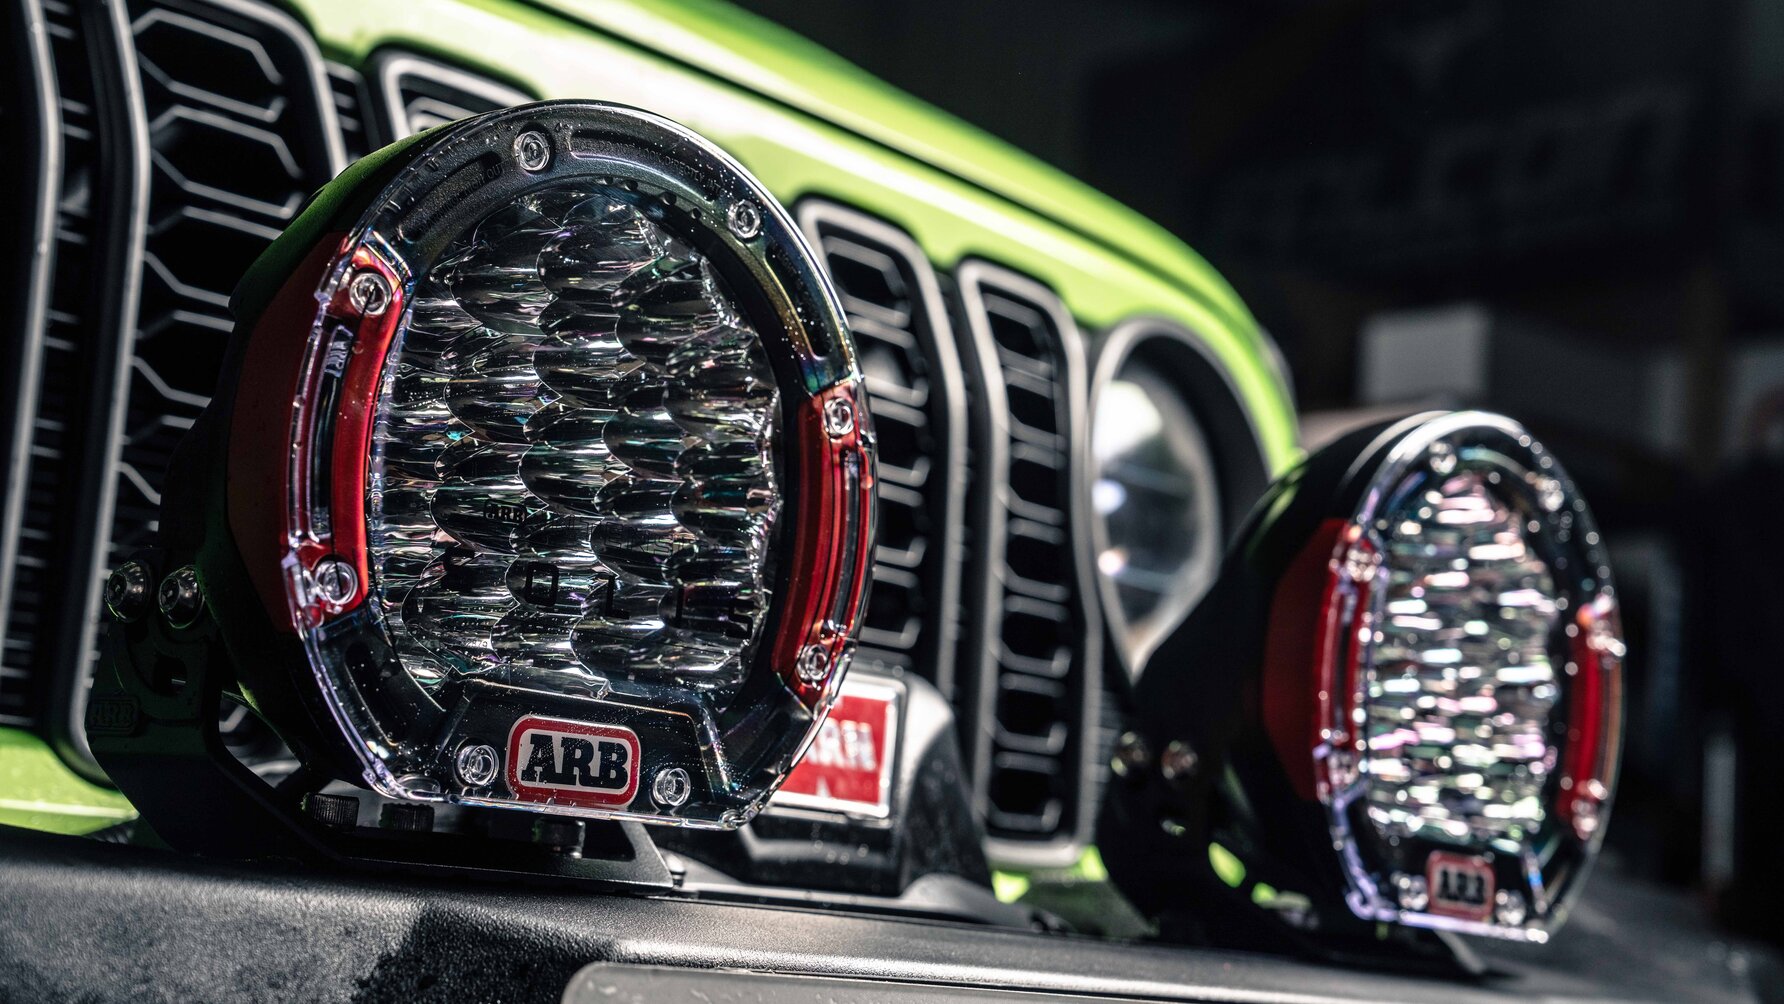
“A lot of people are obsessed with lights,” Andy says. “We’ve had builds with 30+ lights. But it’s usually all for show.” We decided to keep it simple. Just a pair of ARB Intensity Solis seven-inch LED driving lights on the bumper – still bright enough to cause migraines, mind.
The Wrangler’s standard LED lights are great, updated for this model year, but you can always do with more lights. Especially at this time of year. Inside the Wrangler there are four auxiliary switch packs as standard, proof that Jeep knows its customers want to plug other things into their car as it's got its own set of relays and all switches in the car. But we decided to wire into the Wrangler’s high beams, with a dash-mounted dimmer and isolation switch. Handy for mist, or if you don’t want to blind people when you flash them thanks when they let you out. To finish the front end, Sam swaps the Jeep’s front indicators for Morimoto smoked LED units – not to dazzle, just to tidy the look and remove the orange glare.
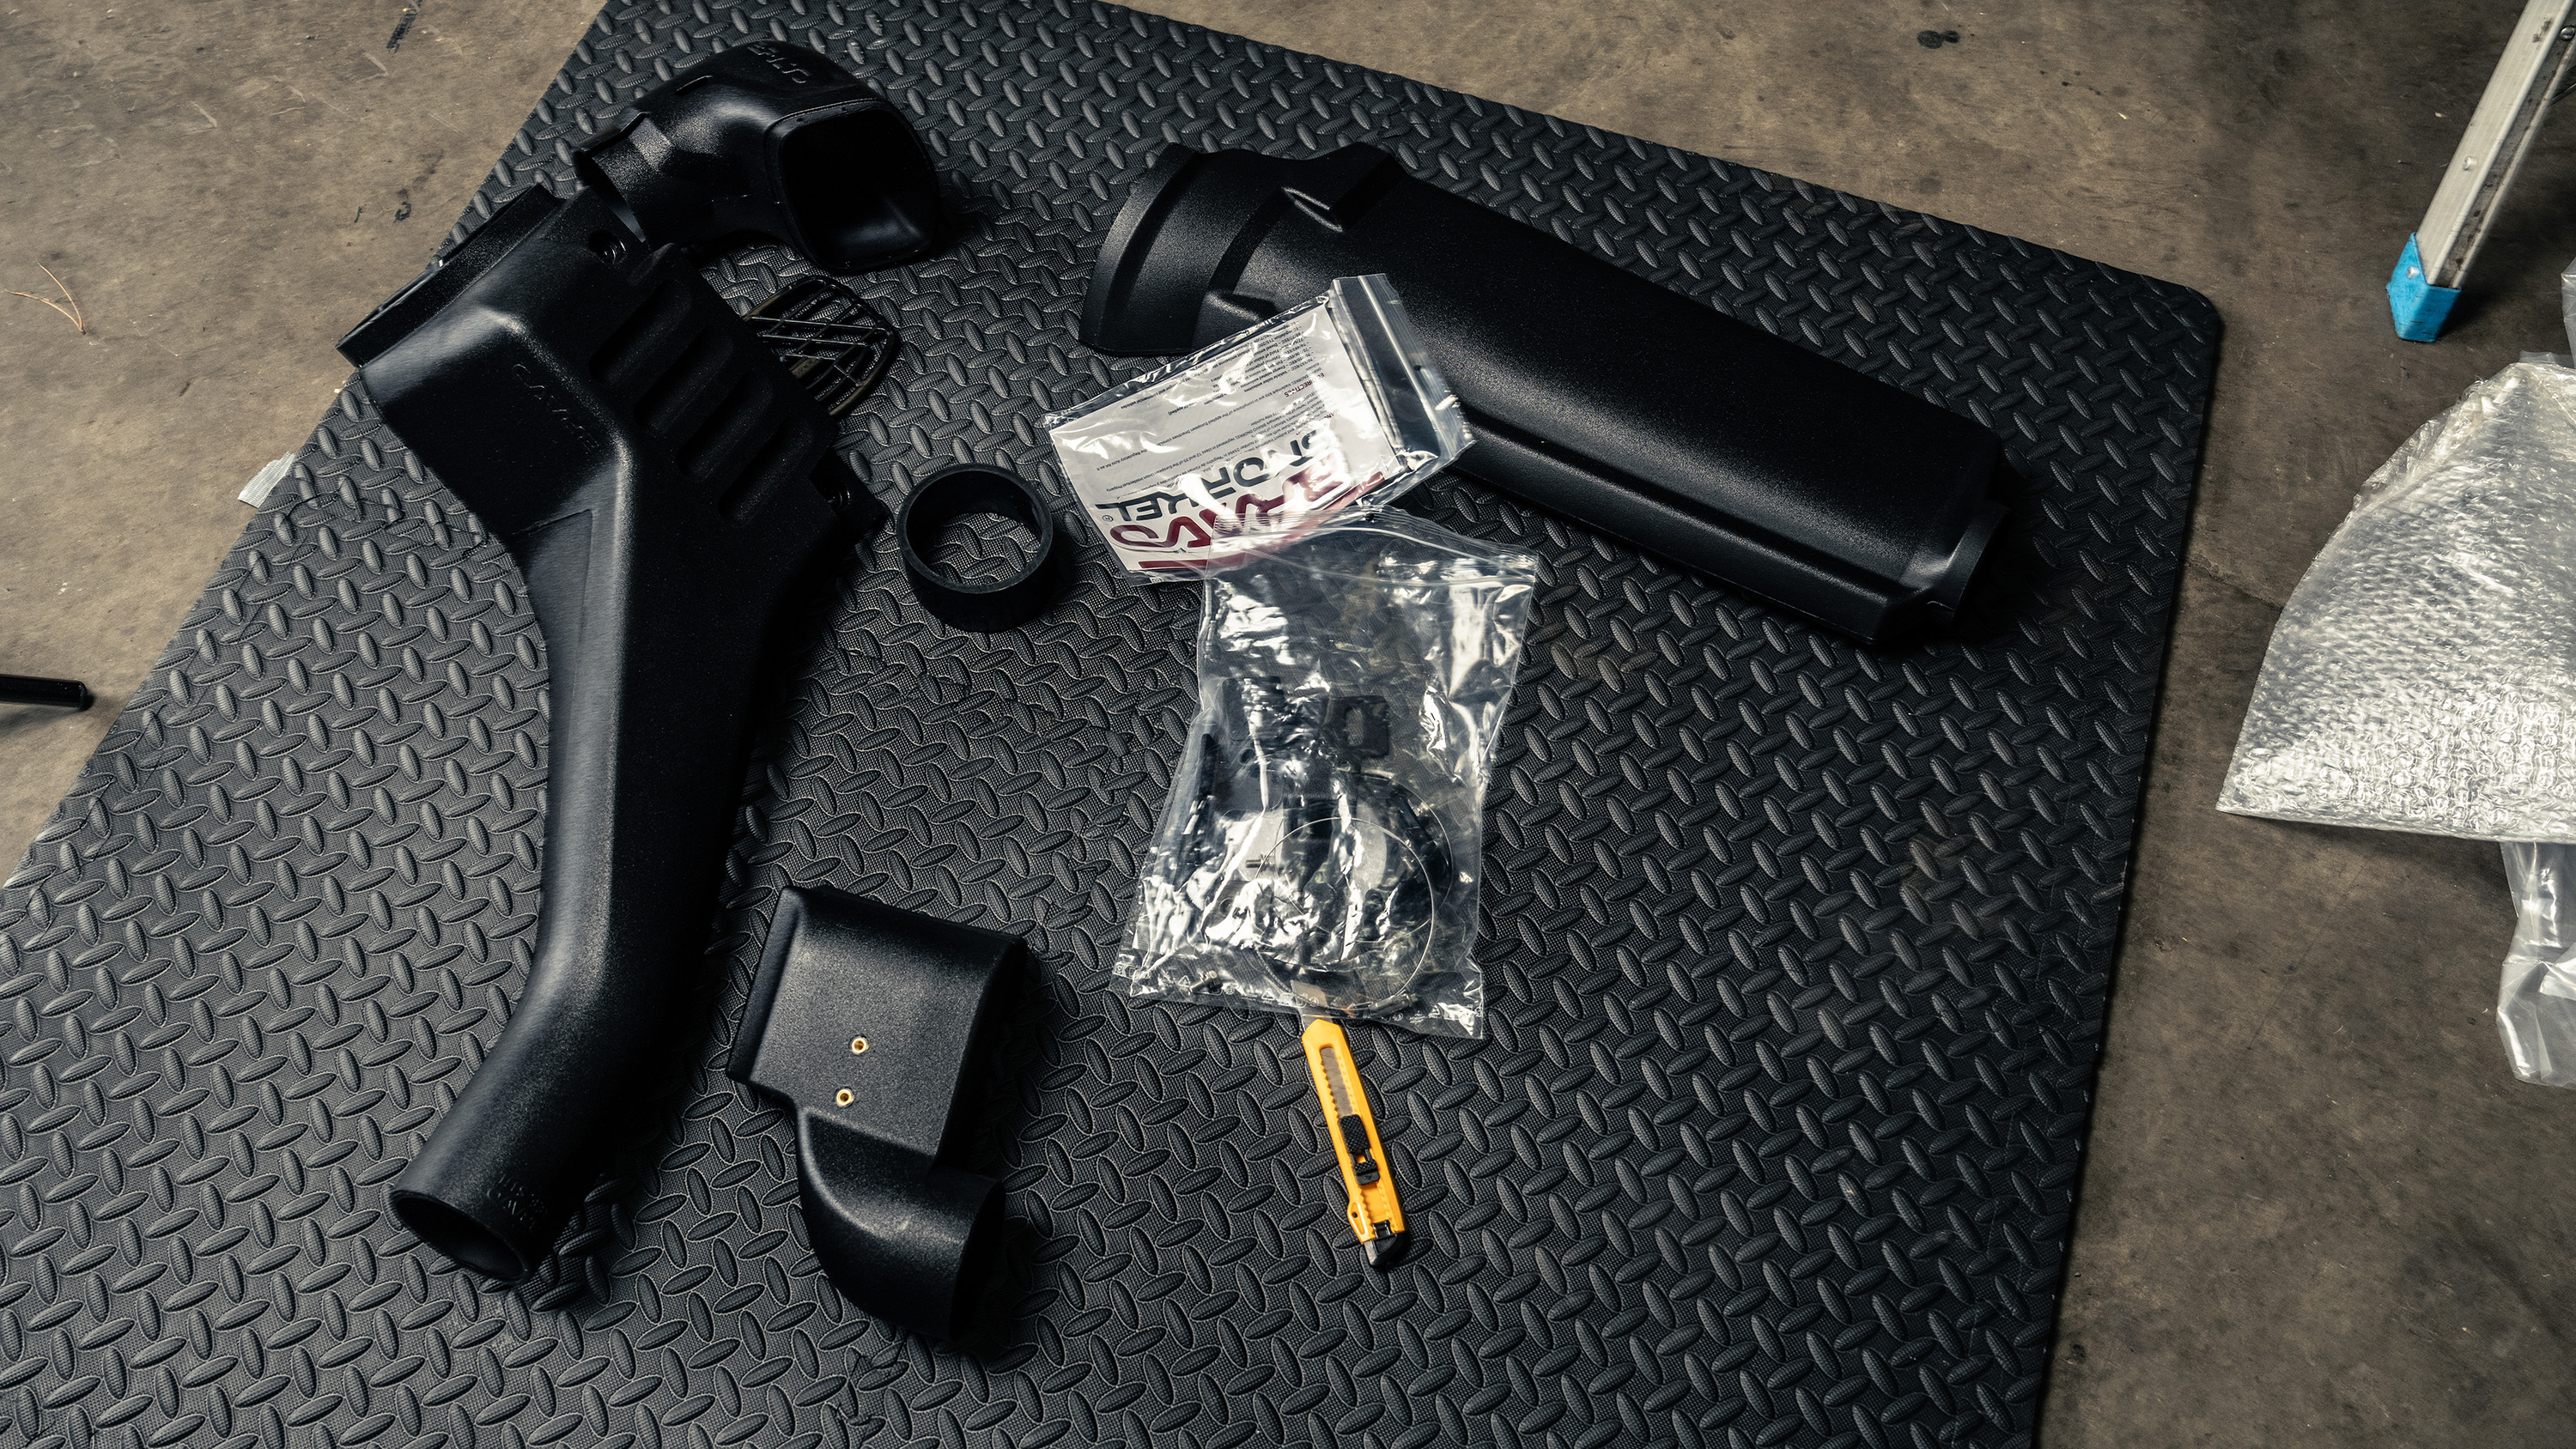
Have you even modified a 4x4 if you haven’t added a snorkel? Answer: no.
The Bravo snorkel we’ve fitted is a thing of understated beauty – engineered, sculpted, subtle. Not a drainpipe bolted to the bonnet. Made in Spain, it snakes through the inner wing with no bodywork cuts. From the outside, it’s discreet. From the inside, it delivers a soft whoosh and cleaner, cooler air – which the engine loves.
It doesn’t turn the Jeep into a submarine, but it does raise the intake above the dirty, hot engine bay. Fitted via a clever adaptor to the existing airbox, sealed with silicone, it still retains the airbox’s drains for water runoff – but obviously, you don’t want to be sucking in water at rest. Ever.

Big tyres = more tramlining. So Sam fits a gas-charged steering damper. Unlike the stock hydraulic unit, this one doesn’t fade or rebound under stress. It brings a calming consistency to the front end – less kickback, more control. Not flashy. Not expensive. Just right. It also looks cooler hanging underneath the car.
As Spiderman once said, with big tyres come big legal responsibilities. If your wheels stick out past your arches, you’re begging for MOT pain. So Sam fits a set of Duratrail extended fender flares – subtle, textured black plastic, matching the factory look. Without them, your side windows get sandblasted by gravel, your paint gets chewed up, and every puddle becomes a Jackson Pollock. But with them, the Jeep looks complete. And even wider.
Once everything’s bolted on, Andy dives into the footwell, finds the OBD port and plugs in JSCAN – the software that tells the Jeep what’s changed. Rolling circumference, shift points, tyre pressures – all updated to match the new setup.
Next, the headlights. With the increased ride height, they need realigning using a beam setter to avoid dazzling oncoming traffic. Left alone, they’d be firing straight into the treetops.
The speedo also gets a recalibration. Without it, because of the new tyres, I’d see around 62mph when I’m actually doing 70 – not ideal. The software corrects this and tweaks the gear shift logic in the automatic gearbox to suit the new rolling radius.
Andy also adjusts the tyre pressures to suit the new rubber. These are LT (Light Truck) tyres, which means their sidewalls are significantly stiffer than regular car tyres – built to support heavier loads, with more internal reinforcement. That extra structure means they don’t need as much air to hold their shape. Too much pressure, and you end up with a smaller contact patch, less grip, and a harsher ride. So, what’s the sweet spot? Around 28 PSI cold.
Meanwhile, Sam torques every bolt back together with the Jeep resting on its wheels – not up on the ramp. That avoids twisting the suspension bushes. Each component is marked with a paint pen – a simple trick that acts like a mechanical lie detector. If anything shifts after a few hundred miles, it’ll show.
What we’re left with is a Wrangler that still looks like a Wrangler – but tougher, taller and more capable. And Storm have been fantastic. They don’t do gold-plated builds or influencer drivel like you see from others. What they do is understand this one specific thing: the Wrangler, at its best, connects you to the ground beneath you. Their job is to make that connection cleaner, stronger, and more satisfying through their insane catalogue of parts.
And what’s it cost?
“We’ve had 30-odd-grand builds,” says Andy. “But most are between £10k–15k.” Ours? Around £12,000.
So what’s next? Well, there’s a new set of tyres on. Let’s not waste them on tarmac.
Get all the latest news, reviews and exclusives, direct to your inbox.
